[Python] asyncio 파헤치기 - ② 코루틴, 태스크, 퓨처, Awaitable
본문은 “Python Concurrency with Asyncio”를 읽고 재구성한 글임을 밝힙니다.
이전 포스팅에서는 asyncio가 non-blocking I/O와 이벤트 루프를 통해 하나의 쓰레드에서 동시성을 달성하는 원리를 다루었다. 본 포스팅에서는 asyncio를 사용하여 하나의 쓰레드에서 동시성(single-threaded concurrency)을 달성하는 프로그램을 어떻게 작성하는지, 여러 개념(코루틴, 태스크, 퓨처)들과 예제 코드를 통해 알아보도록 하자.
1. 코루틴(Coroutine)
우선, 이전 포스팅에서 간단하게만 다루었던 코루틴에 대해 더 자세히 알아보자.
코루틴은 일반적인 파이썬 함수처럼 보이나, 다음과 같은 특징을 가지고 있었다.
- long-running operation을 마주치면 실행을 중지할 수 있다.
- 해당 long-running operation이 완료되면 중지된 코루틴을 wake up 하여 남은 동작을 수행할 수 있다.
이때, long-running operation을 마주쳐서 실행을 중지하고 작업 완료까지 기다리는 동안, 다른 작업이 수행될 수 있기 때문에 동시성을 달성할 수 있는 것이다.
이러한 코루틴을 생성하고 중지하려면 async와 await 키워드를 사용하면 된다.
async키워드: 코루틴을 정의할 때 사용한다.await키워드: long-running operation을 수행하기 위해 코루틴을 중지할 때 사용한다.
1-1. 코루틴 생성하기: async 키워드
코루틴을 생성하는 것은 일반적인 파이썬 함수를 정의하는 것과 거의 비슷하지만, def 대신 async def를 사용해야 한다는 점이 다른다.
다음과 같이 코루틴 coroutine_add_one과 일반 함수 add_one을 정의하고, 호출해보겠다.
1
2
3
4
5
6
7
8
9
10
11
12
13
14
15
# 코루틴
async def coroutine_add_one(number: int) -> int:
    return number + 1

# 함수
def add_one(number: int) -> int:
    return number + 1

function_result = add_one(1)
coroutine_result = coroutine_add_one(1)

print(f'Function result is {function_result} '
      f'and the type is {type(function_result)}')
print(f'Coroutine result is {coroutine_result} '
     f'and the type is {type(coroutine_result)}')
이렇게 하면 다음과 같이 출력된다.
1
2
3
Function result is 2 and the type is <class 'int'>
Coroutine result is <coroutine object coroutine_add_one at 0x102a083c0> and the type is <class 'coroutine'>
# sys:1: RuntimeWarning: coroutine 'coroutine_add_one' was never awaited
위의 실행 결과에서 알 수 있는 점은 다음과 같다.
코루틴
coroutine_add_one을 호출하면 실행(executed)되는 것이 아니라 코루틴 객체(coroutine object)가 반환된다.
즉, 코루틴을 호출함으로써 추후 실행될 수 있는 코루틴 객체를 생성할 수 있는 것이다. 따라서 코루틴을 실제로 실행하기 위해서는 이벤트 루프 위에서 명시적으로 실행해야 하며, 이는 asyncio.run 함수를 통해 가능하다.
1-2. 코루틴 실행하기: asyncio.run
파이썬 3.7부터는
asyncio.run함수를 지원한다.
asyncio.run은 asyncio 어플리케이션의 main entrypoint가 되는 함수이다. 이 함수의 역할은 다음과 같다.
- 새로운 이벤트 루프를 생성한다.
- 인자로 받은 코루틴을 완료될 때까지 실행하고, 그 결과를 반환한다.
- 메인 코루틴이 완료된 후 cleanup 작업을 수행한다.
- 모든 것이 완료되면 이벤트 루프를 닫는다.
따라서 위에서 생성한 코루틴 coroutine_add_one을 실행하려면 다음과 같이 작성할 수 있다.
1
2
3
4
5
6
7
8
import asyncio

async def coroutine_add_one(number: int) -> int:
    return number + 1

result = asyncio.run(coroutine_add_one(1))

print(result) # 2
1-3. 코루틴 중지하기: await 키워드
사실 위의 코드에서는 coroutine_add_one이 코루틴일 필요가 없다. 왜냐하면 non-blocking 코드만 실행하기 때문이다. 이전에도 다루었듯, asyncio를 사용함으로써 이점을 얻으려면 long-running operation을 마주쳤을 때 실행을 중지하고, 이벤트 루프가 다른 작업을 수행할 수 있도록 해야한다. 바로 이때, 실행을 중지하는 것을 await 키워드를 통해 할 수 있다.
await 키워드의 뒤에는 코루틴을 비롯한 awaitable 객체가 오게 되는데, 여기에서는 편의를 위해 코루틴이라 칭하겠다. 이 키워드의 역할은 다음과 같다.
await뒤에 위치한 코루틴을 실행한다.- 1번에서 실행한 코루틴이 완료되어 결과를 반환할 때까지, 기존에 수행 중이던 코루틴(containing coroutine)을 중지한다.
- 1번에서 실행한 코루틴이 완료되어 결과를 반환하면, 중지되어 있던 코루틴(containing coroutine)이 깨어나게(wake up) 되고 그 결과값에 접근할 수 있다.
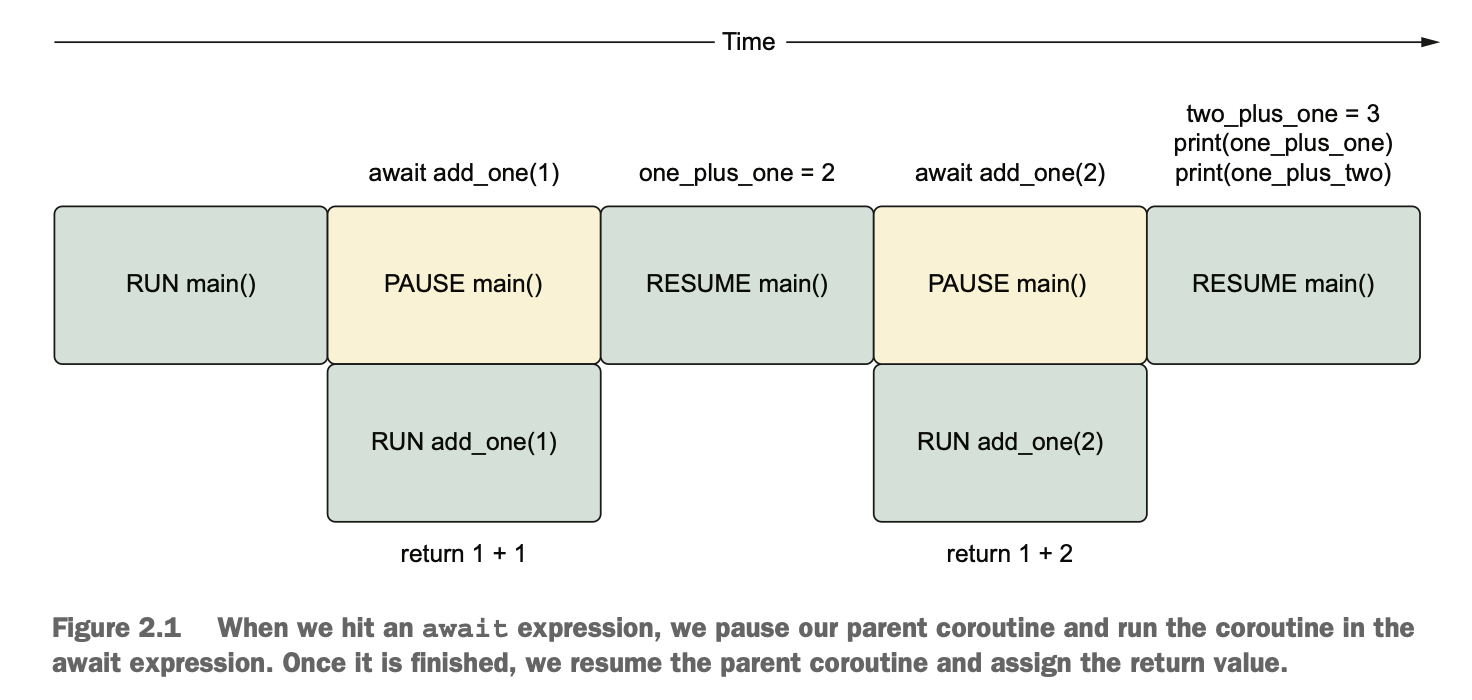
다음과 같은 예제 코드를 살펴보자. 이는 그림과 같이 실행된다.
1
2
3
4
5
6
7
8
9
10
11
12
import asyncio

async def add_one(number: int) -> int:
    return number + 1

async def main() -> None:
    one_plus_one = await add_one(1)
    two_plus_one = await add_one(2)
    print(one_plus_one)
    print(two_plus_one)

asyncio.run(main())
하지만 이는 long-running operation이 존재하지 않기 때문에 일반적인 call stack을 모방한 것과 다를 바 없다. 따라서 dummy sleep 연산을 추가하여 long-running operation을 연출해보도록 하겠다.
1-4. Long-Running 코루틴 연출하기: asyncio.sleep
asyncio에서 동시성이 달성되는 상황은 long-running operation 여러 개를 비동기적으로 실행할 때이다. 이러한 long-running operation을 simulate 하기 위해,asyncio.sleep함수를 사용해보자.
asyncio.sleep의 역할은 어떤 코루틴이 주어진 시간(seconds) 동안 sleep 하도록 하는 것이다. 이러한 asyncio.sleep은 그 자체로도 코루틴이다. 따라서 await 키워드를 필수적으로 사용해야 하며, asyncio.sleep이 실행되는 동안 다른 작업이 수행될 수 있게 된다.
time.sleep과asyncio.sleep은 무엇이 다른 걸까?
time.sleep(secs): 주어진 초 동안 호출하는 쓰레드의 실행을 일시 중지한다.asyncio.sleep(secs): 주어진 초 동안 호출하는 코루틴의 실행을 일시 중지한다.따라서
asyncio코루틴에서 절대time.sleep(secs)을 사용하면 안 된다. 유일한 쓰레드인 메인 쓰레드가 blocked 되므로 전체 프로그램이 중지되기 때문이다!
실습을 하기에 앞서, asyncio.sleep 전후로 텍스트를 출력하는 delay 함수를 작성하도록 하겠다. 이는 long-running operation이 된다!
1
2
3
4
5
6
7
8
9
10
# util/delay_functions.py

import asyncio

async def delay(delay_seconds: int) -> int:
    print(f"sleeping for {delay_seconds} second(s)")
    await asyncio.sleep(delay_seconds)
    print(f"finished sleeping for {delay_seconds} second(s)")

    return delay_seconds
1
2
3
# util/__init__.py

from util.delay_functions import delay
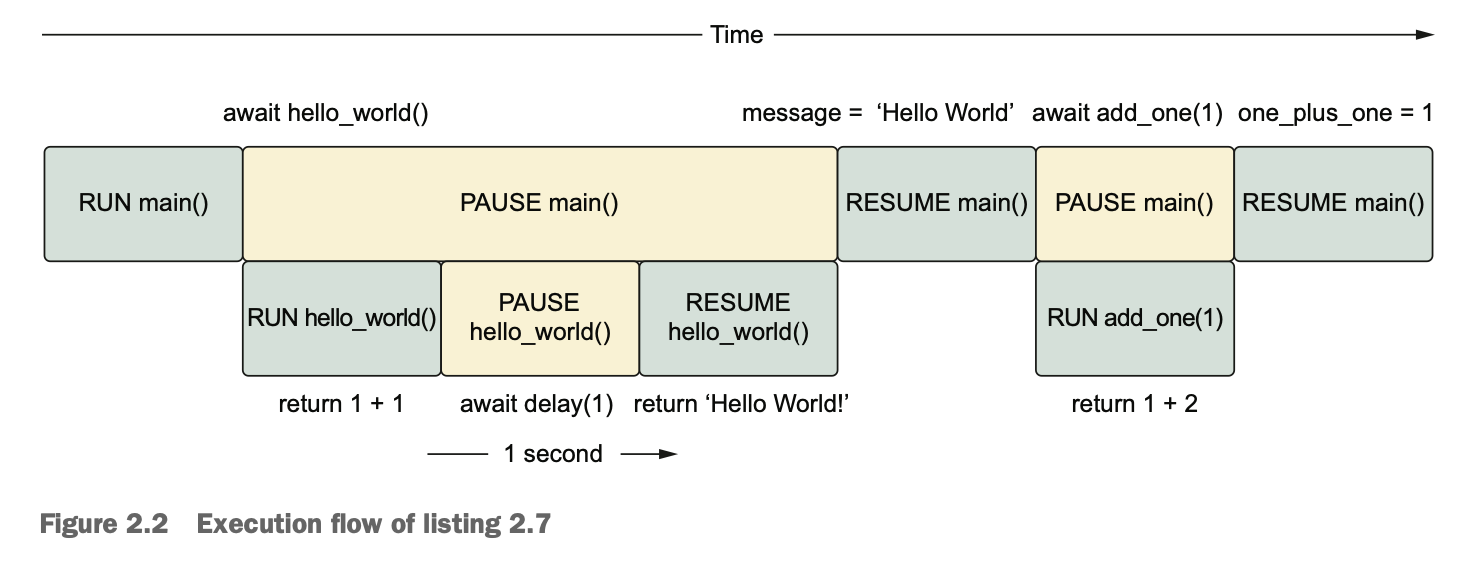
그리고 이를 사용하여 다음과 같은 코드를 작성해보자. 코드만 봤을 때는 hello_world_message가 실행되다가 delay(1)를 마주쳤을 때 중지되고, 다른 작업인 add_one이 실행되면서 동시성이 달성될 것처럼 예상되지 않는가?
1
2
3
4
5
6
7
8
9
10
11
12
13
14
15
16
17
import asyncio
from util import delay

async def add_one(number: int) -> int:
    return number + 1

async def hello_world_message() -> str:
    await delay(1)
    return "Hello World!"

async def main() -> None:
    message = await hello_world_message()
    one_plus_one = await add_one(1)
    print(one_plus_one)
    print(message)

asyncio.run(main())
우리가 예상하는 결과는 다음과 같이 hello_world_message와 add_one이 동시에 실행되는 것이다.
1
2
3
4
sleeping for 1 second(s)
2
finished sleeping for 1 second(s)
Hello World!
하지만 실제 실행 결과는 다음과 같이 동시에 실행되지 않고, 순차적으로 실행된다.
1
2
3
4
sleeping for 1 second(s)
finished sleeping for 1 second(s)
2
Hello World!
이는 await가 현재 실행 중인 코루틴을 중지하므로, await로 인해 실행 중인 작업이 완료될 때까지 다른 코드를 실행하지 못하기 때문이다. 즉, main과 hello_world_message가 모두 중지된 것이다!
그렇다면, 우리가 기대한대로 동시성을 달성하려면 어떻게 해야할까? 여기에서 태스크(task)가 등장한다!
2. 태스크(Task)
이전에 언급했듯, 코루틴을 호출한다고 해서 이벤트 루프가 곧바로 코루틴을 실행하는 것이 아니다. 코루틴을 호출하면 코루틴 객체를 얻게 되며, 이를 실제로 실행하기 위해서는 (1) await 키워드와 함께 사용하거나 (2) asyncio.run에 인자로 넘겨야 했다. 하지만 이러한 방법만으로는 async 코드를 작성할 수는 있지만, 그 무엇도 동시에(concurrently) 실행할 수 없다!
코루틴을 동시에(concurrently) 실행하려면 태스크(task)가 필요하다.
태스크란, 코루틴이 가능한 시점(as soon as possible)에 이벤트 루프에서 실행(execute)될 수 있도록 예약(schedule)하는, 코루틴을 감싸고 있는 wrapper라고 생각하면 된다. 이러한 예약과 실행은 non-blocking 방식으로 수행되므로, 태스크를 생성하면 해당 태스크를 수행하는 동안 다른 코드를 실행(→ 동시성)할 수 있게 된다.
await를 이용한 코루틴의 실행은 (결과가 반환될 때까지) blocking 방식이었으나, 태스크로써 예약 및 실행하는 것은 non-blocking 방식이다. 따라서 동시성을 달성할 수 있게 되는 것이다.
즉, 정리하면 다음과 같다.
태스크를 생성하고 이벤트 루프에 as soon as possible 하게 실행되도록 예약함으로써 비로소 여러 태스크를 동시에(concurrently) 실행할 수 있게 된다.
await나asyncio.run으로 코루틴을 실행하는 것으로는 동시성을 달성할 수 없다.태스크가 long-running operation을 감싸고 있다면, 대기하는 작업이 동시에(concurrently) 이루어진다.
태스크는 non-blocking 방식이기 때문이다.
2-1. 태스크 생성 및 예약하기: asyncio.create_task
asyncio.create_task에 실행하려는 코루틴을 인자로 넘기면, 해당 코루틴을 wrap한 태스크 객체가 반환된다. 또한, 이 태스크 객체를 await 키워드와 함께 사용하면, 작업이 완료될 때 그 결과값이 반환된다.
다음과 같은 코드를 살펴보자.
1
2
3
4
5
6
7
8
9
10
import asyncio
from util import delay

async def main():
    sleep_for_three = asyncio.create_task(delay(3))
    print(type(sleep_for_three))
    result = await sleep_for_three
    print(result)

asyncio.run(main())
위의 코드를 실행한 결과는 다음과 같다.
1
2
3
4
<class '_asyncio.Task'>
sleeping for 3 second(s)
finished sleeping for 3 second(s)
3
이를 통해 asyncio.create_task 시에는 작업이 곧바로 수행되지 않고 태스크 객체가 반환되며, 태스크 객체를 await 할 때 비로소 작업이 수행된다는 것을 알 수 있다. 또한, await 키워드는 해당 태스크로부터 결과값을 얻을 때까지 main 코루틴을 suspend 한다.
asyncio.create_task를 통해 태스크를 생성 및 예약했다면, 해당 태스크를 실행하기 위해서는await를 반드시 사용해야 한다.
2-2. Long-Running 태스크 연출하기 (예시 #1)
이전에 long-running 코루틴을 연출했을 때는 동시성을 달성할 수 없었다. 이는 blocking 방식인
await를 사용했기 때문이다. 이번 섹션에서는 non-blocking 방식인 long-running 태스크를 통해 동시성을 달성해보자!
동시에(concurrently) 실행하기 위한 long-running 태스크를 생성하는 것은 쉽다. 다음과 같이 long-running 코루틴을 원하는 개수만큼 asyncio.create_task에 넘겨 태스크 객체를 얻고, 그것을 await 하면 된다.
1
2
3
4
5
6
7
8
9
10
11
12
13
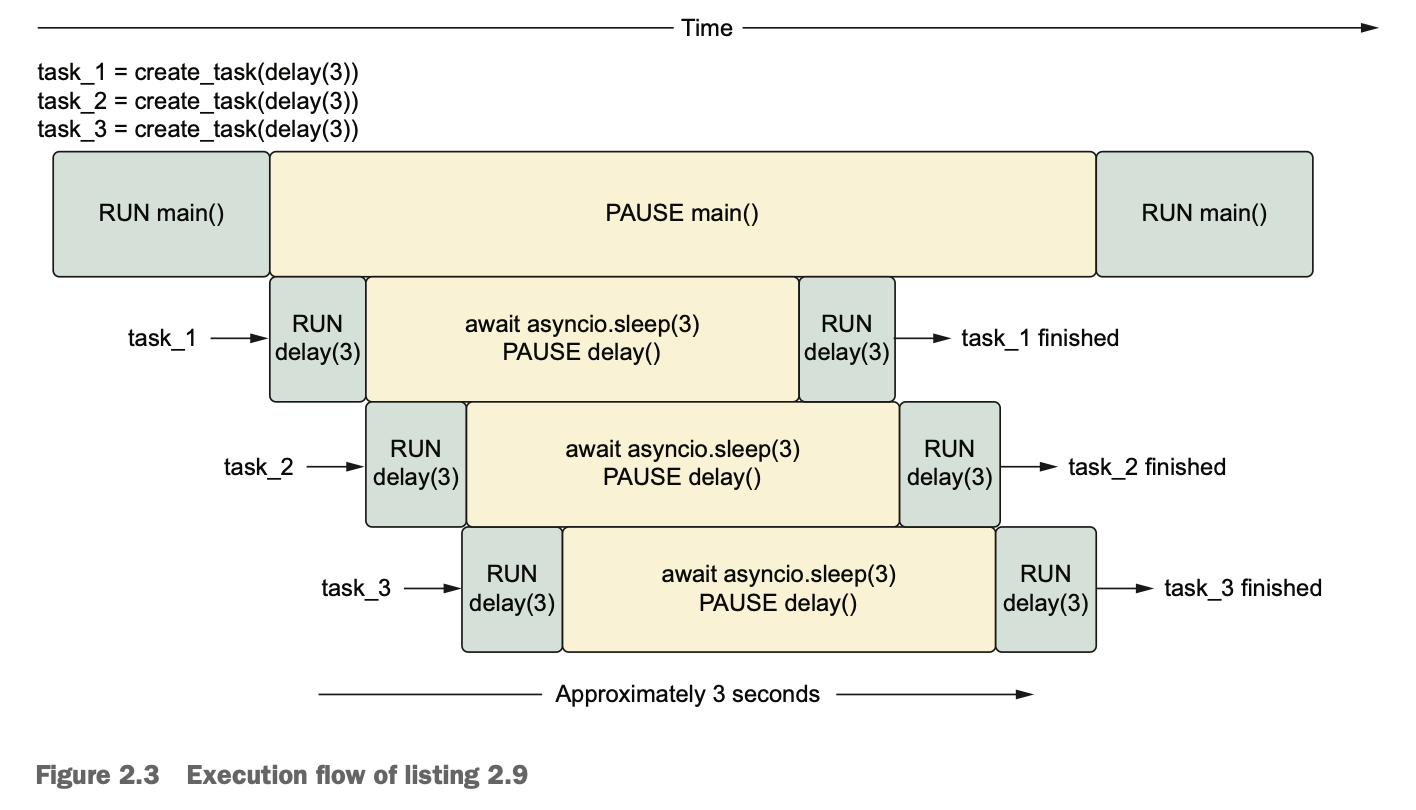
import asyncio
from util import delay
async def main():
sleep_for_three = asyncio.create_task(delay(3))
sleep_again = asyncio.create_task(delay(3))
sleep_once_more = asyncio.create_task(delay(3))
await sleep_for_three
await sleep_again
await sleep_once_more
asyncio.run(main())
asyncio.create_task는 생성한 태스크를 as soon as possible 하게 실행하도록 예약하므로, 태스크를 생성한 뒤 await에 도달하면 예약된(pending) 태스크가 수행된다.
await는 이벤트 루프의 iteration을 야기한다고 이해할 수 있다.
따라서 위의 코드는 다음과 같이 수행되며, sleep operation 세 개가 동시에(concurrently) 실행된다.
2-3. Long-Running 태스크 연출하기 (예시 #2)
또한, 다른 태스크가 완료되기 전에 동작을 수행하는 예시도 다뤄보자.
1
2
3
4
5
6
7
8
9
10
11
12
13
14
15
16
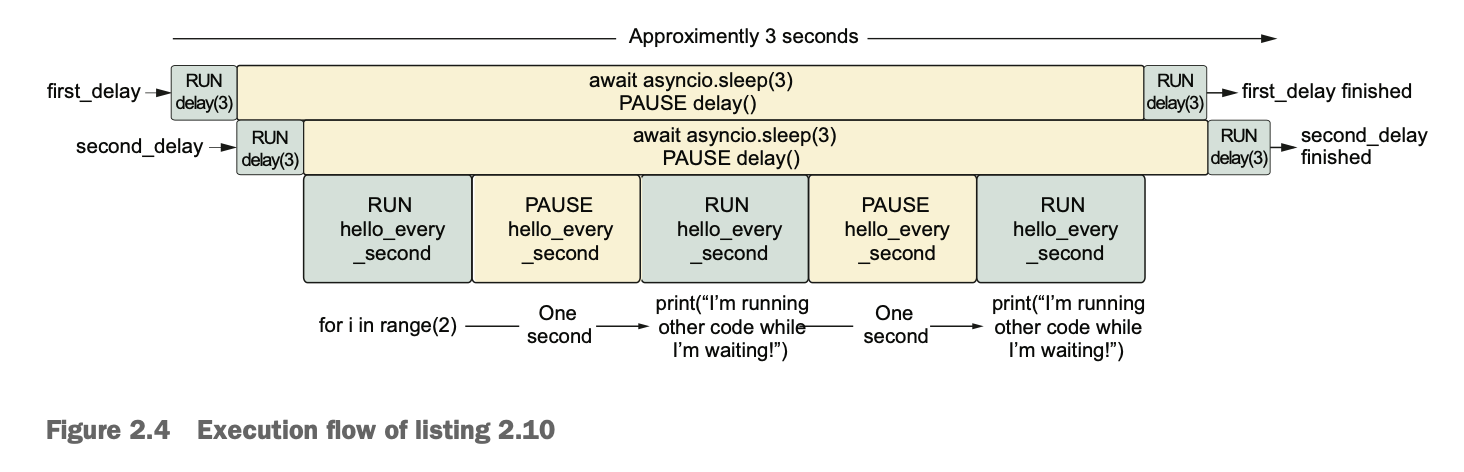
import asyncio
from util import delay
async def hello_every_second():
for i in range(2):
await asyncio.sleep(1)
print("I'm running other code while I'm waiting!")
async def main():
first_delay = asyncio.create_task(delay(3))
second_delay = asyncio.create_task(delay(3))
await hello_every_second()
await first_delay
await second_delay
asyncio.run(main())
위의 코드를 실행하면 다음과 같이 수행된다.
1
2
3
4
5
6
sleeping for 3 second(s)
sleeping for 3 second(s)
I'm running other code while I'm waiting!
I'm running other code while I'm waiting!
finished sleeping for 3 second(s)
finished sleeping for 3 second(s)
즉, 다음의 흐름으로 동작하는 것이다.
- 두 개의 태스크
first_delay,second_delay가 생성 및 예약된다. - 첫 번째
await를 마주쳤을 때, pending 태스크 중 하나가 수행되어delay(3)가 실행된다. - 2번에서 실행한 태스크가
asyncio.sleep을 호출하므로, 남은 pending 태스크가 수행되어 또delay(3)이 실행된다. - 3번에서 실행한 태스크 또한
asyncio.sleep을 호출하는데, 더 이상 남은 pending 태스크도 없으므로 어플리케이션의 다른 코드를 이어서 실행한다. 따라서hello_every_second코루틴이 실행된다.
간단히 정리하면, 3초간 sleep 하는 두 개의 태스크가 수행된 후 그들이 idle 한 시점에 다른 코드인 hello_every_second 코루틴이 실행되는 것이다.
2-4. 태스크 취소하기: Task.cancel
태스크를 사용할 때 가장 우려되는 상황은 그들이 작업을 무한정 긴 시간동안 수행할 수도 있다는 것이다. 어떤 태스크에 대해 평생 기다릴 수는 없기 때문에 태스크를 취소하는 기능이 필요하다.
각 태스크 객체는 cancel 메서드를 가지고 있다. 이를 호출하고 나면 해당 태스크 객체를 await 하는 곳에서 CancelledError가 발생한다. 또한, 태스크 객체가 완료되었는지 여부는 Task.done 메서드를 통해 확인할 수 있다.
다음과 같은 코드를 살펴보자.
1
2
3
4
5
6
7
8
9
10
11
12
13
14
15
16
17
18
19
20
21
22
import asyncio
from asyncio import CancelledError
from util import delay

async def main():
    long_task = asyncio.create_task(delay(10))

    seconds_elapsed = 0

    while not long_task.done():
        print("Task not finished, checking again in a second.")
        await asyncio.sleep(1)
        seconds_elapsed += 1
        if seconds_elapsed == 5:
            long_task.cancel()

    try:
        await long_task
    except CancelledError:
        print("Our task was cancelled.")

asyncio.run(main())
이 코드를 실행하면 다음과 같은 결과를 확인할 수 있다.
1
2
3
4
5
6
7
8
Task not finished, checking again in a second.
sleeping for 10 second(s)
Task not finished, checking again in a second.
Task not finished, checking again in a second.
Task not finished, checking again in a second.
Task not finished, checking again in a second.
Task not finished, checking again in a second.
Our task was cancelled.
이때, 주의해야 할 점은 CancelledError는 await 문에서만 발생될 수 있다는 점이다. 따라서 await로 실행될 awaitable 내에서가 아닌 일반 코드에서 cancel 한다면, 해당 작업은 완료될 때까지 수행되다가 다음 await 문에서 CancelledError를 발생시킬 것이다.
cancel은 현재 실행되고 있는 태스크를 당장 취소하는 것이 아니다.
2-5. 태스크에 Timeout 지정하기: asyncio.wait_for
asyncio.wait_for는 태스크를 일정 시간동안 진행한 후 취소하는 기능을 제공한다. 이는 코루틴 또는 태스크 객체와 초 단위의 timeout을 인자로 받으며, await 할 수 있는 코루틴을 반환한다.
만약 해당 작업이 timeout 보다 긴 시간 동안 소요되면, TimeoutError가 발생되며 해당 태스크는 자동으로 취소된다.
1
2
3
4
5
6
7
8
9
10
11
12
13
import asyncio
from util import delay

async def main():
    delay_task = asyncio.create_task(delay(2))
    try:
        result = await asyncio.wait_for(delay_task, timeout=1)
        print(result)
    except asyncio.exceptions.TimeoutError:
        print("Got a timeout!")
        print(f"Was the task cancelled? {delay_task.cancelled()}")

asyncio.run(main())
1
2
3
sleeping for 2 second(s)
Got a timeout!
Was the task cancelled? True
이때, 태스크에 timeout 정보는 지정하고 싶으나 timeout 만료 시 태스크가 취소되는 것은 원하지 않는다면 asyncio.wait_for에 인자로 넘기는 코루틴 혹은 태스크를 asyncio.shield로 감싸서 사용할 수 있다. 이를 이용하면 TimeoutError는 발생하나, 해당 태스크가 취소되지는 않는다. 이를 통해 사용자에게 “작업이 timeout 이상 소요되고 있다”는 사실을 알릴 수 있다.
3. 퓨처(Future)
코루틴과 태스크는 모두
await식에서 사용될 수 있다. 그 둘의 공통 분모는 무엇일까? 이를 이해하기 위해서는 퓨처(future)와 awaitable에 대해 알아야 한다.
퓨처란, 언젠가는 얻을 하나의 값을 가지고 있거나 가지고 있지 않은 파이썬 객체이다. 따라서 퓨처를 새롭게 생성한 시점에서는 그 값이 없기 때문에 incomplete, unresolved, not done이라고 표현하며, 그 값을 얻고 나면 퓨처에 그 값이 설정되고 complete 상태가 된다. 이 상태에서 해당 결과값을 추출해오는 것이 가능하다.
다음과 같은 간단한 코드로 동작을 살펴보자.
1
2
3
4
5
6
7
8
9
10
from asyncio import Future

my_future = Future()

print(f"Is my_future done? {my_future.done()}")

my_future.set_result(42)

print(f"Is my_future done? {my_future.done()}")
print(f"What is the result of my_future? {my_future}")
1
2
3
Is my_future done? False
Is my_future done? True
What is the result of my_future? <Future finished result=42>
이러한 퓨처 또한 await 식에서 사용될 수 있다. 퓨처를 await 한다는 것은 다음을 의미한다.
- 현재 작업을 퓨처에 값이 설정될 때까지 중지한다.
- 퓨처에 값이 설정되면 중지된 작업을 깨워서 작업을 재개한다.
이를 확인하기 위해 다음의 코드를 실행해보자.
1
2
3
4
5
6
7
8
9
10
11
12
13
14
15
16
17
18
19
20
from asyncio import Future
import asyncio

def make_request() -> Future:
    future = Future()
    asyncio.create_task(set_future_value(future))
    return future

async def set_future_value(future) -> None:
    await asyncio.sleep(1)
    future.set_result(42)

async def main():
    future = make_request()
    print(f'Is the future done? {future.done()}')
    value = await future
    print(f'Is the future done? {future.done()}')
    print(value)

asyncio.run(main())
실행 결과는 다음과 같다. 즉, main은 await future에서 해당 future에 값이 설정될 때까지 1초 정도 중지된다.
1
2
3
Is the future done? False
Is the future done? True
42
사실
asyncio를 사용하면 퓨처를 직접 다룰 일은 거의 없기 때문에, 지금 단계에서는 퓨처가 무엇인지 정도만 알고 넘어가자!
4. Awaitable
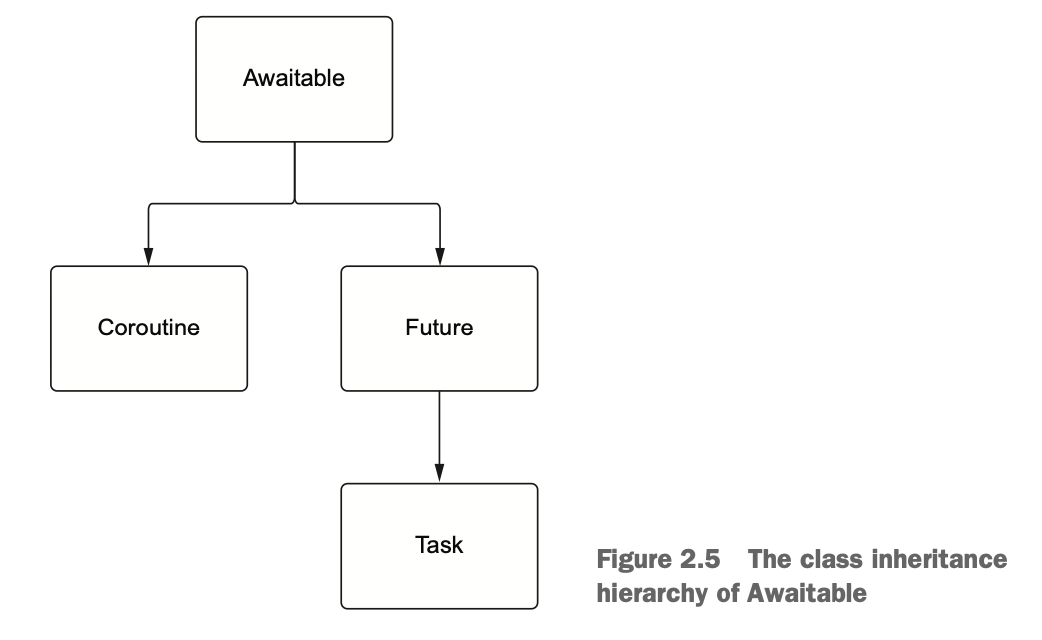
지금까지 코루틴, 태스크, 퓨처에 대해 살펴보았다. 이것들은 모두 await 뒤에 올 수 있다는 점에서 서로 연관되어 있다는 느낌이 들지 않는가?
이처럼 await 식에 사용될 수 있는 객체를 awaitable 이라 하며, 코루틴, 태스크, 퓨처는 모두 Awaitable abstract base class를 구현한다.
Awaitableabstract base class는__await__추상 메서드를 가진다.→
__await__메서드를 구현한 객체는 awaitable 이다.
정리하면, 다음의 도식에서 확인할 수 있듯이 코루틴과 퓨처는 Awaitable을 상속 받고, 태스크는 퓨처를 확장한 것이다.
여기까지
asyncio에서 핵심 개념인 코루틴, 태스크, 퓨처, 그리고 awaitable에 대해 예제 코드와 함께 다뤄보았다. 이어지는 포스팅에서는asyncio를 통해 CPU-bound 작업을 수행할 때와 I/O-bound 작업을 수행할 때의 차이점을 실제 코드로 알아보자.
References
- “Python Concurrency with Asyncio”, Ch02.
asyncioBasics - https://docs.python.org/ko/3.11/library/time.html#time.sleep